Apr 30, 2008

Simple, but full of taste


Mmmm, sometimes it is really nice to go simple. Simple for dessert (as in my previous post, with the Mirabelle Plum Crumble) and simple for main course which I am posting about here. I had been craving for a piece of meat, and the weather had been so lovely these last few days so I wanted to spend little time in the kitchen and more time eating out under the sun. So I went out, bought some really nice pieces of veal (I got noix de veau / bottom round) and accompanied it with absolute basics: potatoes and tomatoes.

The potatoes however were mixed with some chopped green olives before going into the oven- it adds an extra taste.


The stems were kept on the roasted tomatoes- I feel it gives an interesting visual effect.

And because there really is not so much to write about simple pleasures, I will cut it short and just conclude that a no-fuss meal can provide as much satisfaction as a high end gourmet menu! This dish is quick to prepare, leaves almost no mess behind, and is full of taste!


Recipe for a delicious and simple veal dish:

Ingredients:
  • Veal- try to get some nice thick pieces, like bottom round
  • Potatoes
  • Green olives
  • Milk (or cream if you want something more rich)
  • Olive oil
  • Small tomatoes (kept with stems if you wish)
  • Salt & Pepper

How to make it:


Peel the potatoes and slice them. Place them in a deep baking pan. Chop the green olives. In a small bowl, mix some milk, olive oil, salt, pepper and the chopped olives. Add this mixture to the potatoes in their baking pan, and make sure the potato slices are well covered with this. Bake in oven for about 20 minutes. Once they are ready, place the tomatoes in the oven under grill, and keep the potatoes too- so let them both grill for about 10 minutes. During that time, heat a pan, add some olive oil, add pan sear the veal on high heat first, and then lower heat. Before reducing the heat, season with salt & pepper. Serve everything together, this should be enjoyed at an edible hot temperature. Enjoy!

Bookmark and Share

Apr 28, 2008

Mirabelle Plum Crumble

I had been in Dubai recently and brought some cardamom from there. It’s been almost a month now that I keep telling myself that I need to use it in my cooking…but for some reason haven’t been motivated. The other day however as I was doing some food shopping, some Mirabelle Plums captured my attention. Their glowing yellow colour and round form looked like miniature suns, and they seemed to go so well with the beautiful sunny weather that we’ve been having these last few days. So my purchase decision was made in less then a second, and back home I was wondering what to do with these plums now. As usual, I buy stuff without really knowing what I want to do with it, and it’s only once I’ve paid that my brain starts thinking. You can say that I am very much of a spontaneous or impulsive shopper!

Above: Cardamon

Then I remember the cardamom, and I remember some other ingredients lying around the house too- pistachios, sesame oil, ricotta… And so I thought to myself that a fruit crumble would be a great way to finish a meaty dish (veal to be precise, I will post about it soon). I could not imagine a gooey rich chocolate type delicacy after a satisfying meat dish, so it was 1-0 for the crumble.

Above: Mirabelle Plums

It is rare that I go for “simple”, but this time it was really what I was craving for, so a crumble was perfect, but nonetheless I did not want to just make a regular apple crumble or what not. I think I was inspired by Mediterranean ingredients, which explains the ricotta and medley of pistachios, cardamom and sesame oil. It’s the first time I use cardamom in a crumble, and all I can say is that I have absolutely no regret- it’s now my new fetish ingredient!

Recipe for Mirabelle Plum Crumble with Cardamon & Pistachio:
(Note: I am not indicating exact measures here sorry, I don't really measure when making crumbles!)
Ingredients:
  • Mirabelle Plums, seeds removed.
  • Flour
  • Sugar
  • Butter
  • Sesame oil
  • Pistachios, crushed
  • Cardamon, ground (count a generous teaspoon for 4 servings)
  • Ricotta (optional)

How to make it:

Preheat oven. In a bowl, mix plums with some crushed pistachios (and sugar, optional. I personally don't like my crumble too sweet). In your crumble containers/pots, fill about 3/4 with the mirabelle plums. In a seperate bowl, mix flour, sugar, cardamon, butter (use less butter then you usually would) and sesame oil (which will add a really distinctive taste to the crumble). With your hands, mix until it becomes crumby, and top this off on the fruits. Bake in oven for about 15/20 minutes, and then put under grill for a golden colour. Serve with a cloud of ricotta (optional).

Bookmark and Share

Apr 21, 2008

Cooking tuna wrapped in vineleaves

Canned tuna is a funny thing. Until one point in my life, I thought tuna only existed in cans. That of course runs back to when I was a kid who was stubborn when it came to eating fish. It was either fish nuggets or canned tuna, but keep the seabass and salmon away from me! Very very fortunately, all of that has changed now as I adore fish, maybe even a bit more then beef, chicken, lamb and porc. And I will always remember the first time I ate “real” tuna- one that did not come out of a can. The first thought that hit my mind was “OMG what have I been eating all these years?” Tuna not out of a can tasted so different, it tasted like heaven and it definitely made me put a big fat red X on canned tuna…for life!

So the other day I decided to cook some tuna, but instead of just pan-searing as I normally do, I decided to wrap them in vineleaves before they touch the bottom of the pan. Vineleaves are a popular ingredient in Middle Eastern, Turkish and also Greek cuisine as we use them to make dolmas (if you are not familiar with dolmas, please check out a great post on Café Fernando which also features the infamous dolma rolling machine!)

Above: vineleaves, ready for use

In my opinion, and following what my tastebuds say, vineleaves tend to have a bit of an amertume lemony taste, so they go perfectly well with fishes. If you’re curious and interested in doing the same, scroll down for the recipe!

Tuna wrapped in vineleaves, couscous with grilled sesame & mini ratatouille.

Ingredients:
  • Fresh tuna steaks
  • Vineleaves (count 3-4 leaves per tuna steak)
  • Couscous
  • Grilled sesame seeds
  • Zucchini
  • Eggplants
  • Cherry tomatoes (or just regular tomatoes, but preferably smaller ones in size)
  • Garlic
  • Olive oil, lemon, salt & pepper to season

How to make it:

Prepare your mise-en-place: dice the zucchini & eggplants. The smaller the better if you want to obtain a "mini ratatouille" effect. Crush some garlic cloves, keep aside. Flatten the vineleaves, set aside. Grill the grilled sesame seeds in the oven until they become a slightly darker golden colour (I grill grilled sesame seeds, even if they are already grilled, but it enhances the flavour even more and makes a perfect combination with the couscous). While you're grilling the sesame seeds, do the tomatoes at the same time. I placed a grilled tomato on top of the ratatouille (instead of mixing it in with the zucchini & eggplant). Prepare the ratatouiile: heat some olive oil in a pan, then add the zucchini, eggplants, garlic, salt & pepper. Cook for a few minutes until ready. Cook first on high heat, then reduce heat and cover the pan. Cook for less time then you usually would, as the ratatouille will be kept on a very low heat (to stay warm) until the couscous & tuna are prepared. For the tuna: season each tuna steak with salt & pepper, rub with lemon, and cook in a heated pan with olive oil for a few minutes. At the same time, prepare the couscous (follow package instructions). When couscous has absorbed all the water, throw in the sesame seeds, a small dash of olive oil, add some salt and mix well. Enjoy the tuna, couscous & grilled sesame and the mini ratatouille at the right serving temperature!

Apr 13, 2008

Falafels from scratch

Falafels sprinkled with sumac

As one side of my family is Egyptian, falafels are something I've seen frying many times in my kitchen. Held between two fingers and dipped in hummus or eaten wrapped in pita bread, falafels are probably one of the most popular Middle Eastern specialities. The origin of falafel however remains a big question mark for me- every country in the Middle East will claim that it is them who "invented" falafel. Today it seems most people associate falafels as Egyptian or Isreali dishes, and although both recipes are delicious (the ingredients vary slightly) the one I'll be posting below is a traditional Egyptian one.

Falafel tools, the gold coloured one below is really old but we'll never get rid of it. The one above is a more modern version. Both were brought over from Egypt.

The core ingredient to falafels are either chickpeas or fava beans (or a mixture of both). Egyptians tend to prefer the latter, which is also the main ingredient to the popular dish "fool mudammes". Another variation is whether you choose to add parsley or not- in Egypt most love parsley in their falafels (which also adds a greenish colour aspect to the insides). Oh, also another detail- falafel is actually called "ta'amiya" in Egyptian, as dialects in the Middle East vary.

Using the tool to shape the falafels as they fall into hot frying oil

So although it is easier to just buy some falafels from food shops or restaurants, and today there even exist ready-to-mix falafel boxes (which would be criminal to bring into our kitchen!) it is worth just once making falafels from scratch!

One key ingredient is flour for a good texture and consistency. If there isn't enough of it... then the falafels loose their shape and explode...(below)

How to make falafels from scratch (recipe makes about 50 pieces):
You will need:
  • 1/2kg of fava beans
  • 2 big onions, peeled and chopped into chunky pieces
  • 10 garlic cloves
  • 1 tablespoon coriander
  • 1 tablespoon cumin
  • 1/2 tablespoon salt
  • 1 bundle parsley, chopped
  • 4 tablespoons flour + 20gr baking powder
  • Sesame seeds (optional) + sumac (optional but highly recommended!)

Ready to start?

First, soak the fava beans in water for 48 hours. Then peel them and place in a bowl. Add to the bowl the onions, garlic heads, coriander, cumin, salt and parsley. Mash everything in a food processor by adding the ingredients bit by bit. Repeat this process twice to obtain a thick paste. Then, add the flour and baking powder for good consistency and so that the falafels keep a "ball" shape while they fry. If you don't have the falafel tool, use a tablespoon and keep a cup of warm water near you. Each time, dip the spoon in the water, fill the spoon with the falafel paste, sprinkle generously with sesame seeds, and place it above the frying oil and let the paste "slip off" the spoon. Fry for a few minutes until golden-darkish brown (make sure the insides aren't raw, so make sure you let them fry long enough!) Enjoy and eat them quickly before they get cold! If you have sumac, sprinkle some over the ready falafels- they really add a great "special something"!


Bookmark and Share

Apr 11, 2008

Home made Labneh balls

Labneh balls alongside magdous (will blog about magdous very soon!), zaatar & green olives


Almost everyone knows hummus, but are you familiar with Labneh ? Labneh is a delicious Middle Eastern spread-speciality made from yoghurt and over a period of days then transformed into a delicious fresh cheese with a creamy texture and a hint of yoghurt sournesss. It is traditionally served drizzled with olive oil and dried mint, and in its most simplest form enjoyed with Arabic bread and a cup of black tea. A real no-fuss delight! Well what I just described is Labneh, but from that you can also make Labneh balls, which for me personally are even yummier. The difference is that in it’s balls version (OK this "balls" thing is going to start sounding funny now, but please - do not read this post with a dirty mind!) all the humidity is removed, the texture is firmer, and the balls need to be conserved in a jar filled with olive oil (whereas Labneh can be conserved in a container, the way cream cheese is). You can either buy Labneh balls or make them. Since I live in France and it not as easy to find them compared to the Middle East, we enjoy making it at home. It’s nothing difficult, the only thing you will need is patience!

Rolling the Labneh into balls

Removing the humidity from the balls. They are ready when the muslin is no longer wet.


Serve Labneh balls floating over olive oil!

How to make Labneh balls:

What you’ll need:
  • About 1kg of Yoghurt- try to get the creamiest type available. In France I use “fromage blanc”. Remember to add a pinch of salt to the yoghurt.
  • Olive oil & a clean jar (for the very end)
  • Large pieces of muslin
  • Strainer, bowls, plate

How to make it:
1-Place the strainer over a bowl. Place the muslin over the strainer, and pour the yoghurt over the muslin. With the muslin pieces that are overlapping on the sides, cover the top surface of the yoghurt. What you now have then is yoghurt wrapped in muslin, sitting over a strainer, and the strainer is over a bowl. Tie the muslin so it forms a “yoghurt contained bag”. Over 1-2 days, all the water/humidity will drain out of the yoghurt and will drip into the bowl underneath. Just make sure that you change the muslin cloth every 24 hours for hygiene.

2-Now that the humidity has been removed, when opening the muslin parcel, you will notice that the yoghurt has become firm with an almost cream cheesy texture. This is Labneh, but we still have to go a step further.

3-Bring a plate and cover it with a clean piece of muslin. Take the labneh and shape into balls. Place the balls over the muslin (which is over the plate) and when all the balls are formed, cover (without pressing!) with another piece of muslin. Every morning/evening check to see how much humidity is being absorbed by the muslin, and make sure to change the muslin regularly. You’ll know the balls are ready when the muslin stops absorbing humidity.

4-Now your Labneh balls are ready. You can either enjoy them plain, or roll them in mint, za’atar, sesame seeds, hot pepper, etc… To preserve them, place the balls delicately (they can break easily!) in a wide jar, and at the end fill up with olive oil. Take note that you do not need to place the jar in the fridge (not good for the olive oil).

*NOTE: Some of you are commenting as to what alternatives there are to muslin, so I would just like to point out that if you do not have muslin, coffee filter strainers are a perfect substitute! I personally use that if there is no muslin around! Good luck, and if you have any further questions please feel free to ask!

Bookmark and Share

Apr 3, 2008

Back from Dubai

The Burj Al Arab seen from Medinat Jumeirah

Hello! I was in Dubai last week and upon returning to Paris I haven't had much time to blog! But now I have some time to squeeze in and thought I would share some photos and notes on my trip to Dubai. It was not my first time visiting Dubai, but all of my previous trips left me a bit confused on whether I actually liked that city or not... this time however, something changed and I've started to appreciate it a bit more. Anyone who has been to Dubai would understand me if I said the city was too "plastic" (and that was the principal reason why I did not like it). Dubai is a city which in the past few years has been booming and emerging at a fast pace filled with skyscrapers, luxurious hotels and shopping malls growing like mushrooms in each and every corner. When you drive in Dubai, pretty much all you see around you are tall buildings and constructions which only illustrates it's growth and desire to become an International cosmopolitain city. So in that sense, it becomes interesting because you are actually living "the moment" of a city developping itself. It's like going thousands of years back when today's "modern" countries were being built...except that today we have technology which accelerates the whole process. I don't think there are many places in the world where you can observe the birth of a city in live-motion.

One of the many beautiful sceneries at Medinat Jumeirah

Anyway, it is a place I definately recommend to visit (if you havent been there). It's sunny almost all year round, people are friendly, the cultural melting pot is incredible, the tolerance that the rulers of the UAE have imposed to allow these cultures to blend is admirable, the service is great (and much cheaper then in Europe), and if you are a shopping addict- Dubai is the place to be. I came back with many new pairs of shoes! And oh ya, before I forget- flying with Emirates Airlines is seriously awesome. And also, the airport is very cool!

Beautiful decorative items at Mall of the Emirates

So I truly enjoyed the sun, got myself a nice tan, while my camera enjoyed clicking away capturing the contrasting landscapes of Dubai. Here are some photos I wanted to share with some interesting finds, notably at the Spice Market (descriptions below). For the full set, please feel free to check it out on my Flickr stream!

The extravagant one-of-a-kind Ibn Battuta Mall

Gold vitrines at the Gold Market


Street scene at the Gold Market


Scenes from the fish (and fruit/veg) market


Dates are very popular in the UAE. Above, stuffed with pistachios. On the right, Persian sweets made from chickpeas- the taste was really interesting (in a good way!)

Beautiful saffron and flaming hot dried peppers

Dried lemons (left) and quasi-ancient washing powders (right) - the stuff people used before Ariel & Tide existed!
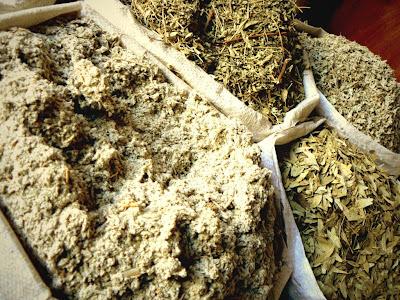
On the left, the bag which looks like a pile of dust turned out to actually be a tea for diabetics!


And above another interesting find- a plant used for infusions for pregnant women after they give birth. It is meant to "cleanse them".
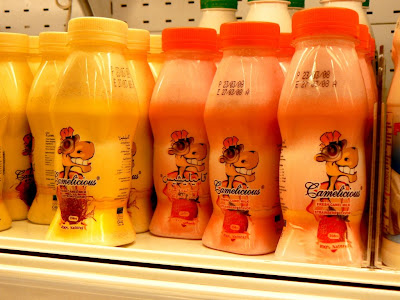

And faithful to my odd visiting-supermarkets-in-foreign-countries habit, bottles of Camelicious camel milk! Pick your flavour- saffron or strawberry.